Heading out the door? Read this article on the new Outside+ app available now on iOS devices for members! Download the app.
I’m a huge advocate of props. Not only do they help you find more space and stability in your poses, they’re also great teaching tools with endless uses if you get creative. I love taking workshops and discovering new ways to use blocks, blankets, walls and straps, and incorporating them into my classes. I find the more time we dedicate to playing with props, the more likely my students are to continue using them.
10 New Ways to Use Yoga Props
Overhead Shoulder Flossing with a Strap
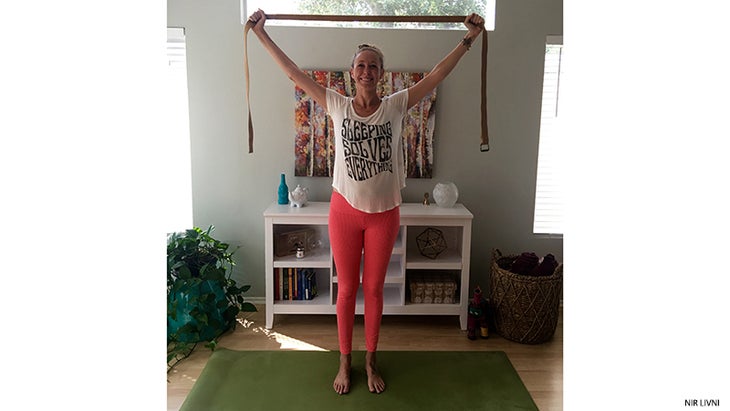
There are many neat ways to use a strap for shoulder openers, however, I’m obsessed with this simple overhead shoulder-flossing technique. Clients and students love it as well. It’s one I would prescribe daily to just about anyone. It’s ideal for lengthening out and opening up after a long day of sitting.
Stand in Tadasana holding onto the strap in front of you down by your waist. Widen your hands apart until you’re gripping the strap wider than your shoulders. Inhale and take the strap up overhead; exhale and bring the strap behind you (if your shoulders won’t let you take the strap back, simply widen your grip). Inhale and bring the strap back overhead; exhale and lower it in front of you. Repeat 5 times.
See also Touch with Skill: 4 Essential Steps for Hands-On Assists
Sun Salutations with Blocks
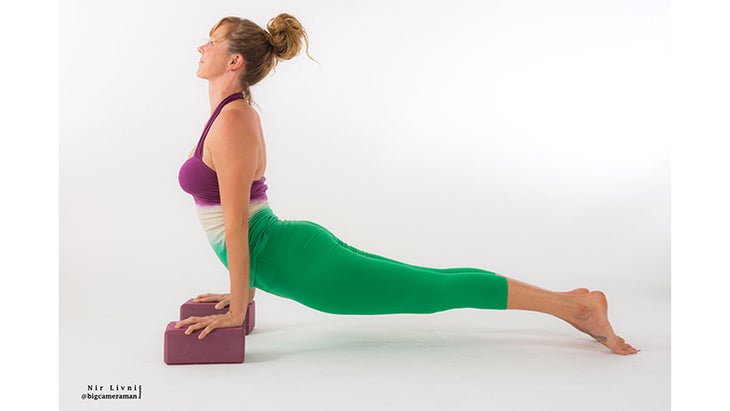
Experience freedom as you move through Surya Namaskar A and B by practicing with your hands on blocks (gripping required).
Essentially lengthening your arms, the extra lift through your armpits allows you to step back from Uttanasana and forward from Downward-Facing Dog more freely. It also allows the transition from Chaturanga Dandasana to Upward-Facing Dog to take place without coming down to the floor. Plus, having students practice Down Dog with their hands on blocks is a great way to teach them how to press down through the palms and lift the underside of their arms and shoulders. Not to mention, jumping forward, back and through with your hands on blocks is a lot of fun, too!
See also Mary Beth LaRue’s 10 Favorite Places to Find Creative Inspiration
Wide-Legged Forward Fold with a Blanket
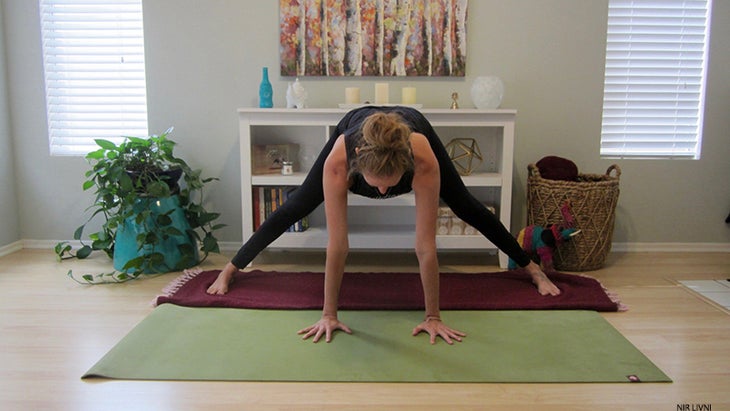
Designed to teach students how to hug their legs toward the midline and engage their lower bandhas by lifting up through the pelvic floor, this move will strengthen your inner thighs and core. It’s also fantastic prep work for those on the quest to conquer the straddle press Handstand.
Fold a blanket in half lengthwise and place it on the floor alongside the long edge of your mat. Stand on the blanket with your feet wide apart, bend your knees, and forward fold, placing your hands on the mat (or a pair of blocks). Inhale, straighten your arms and lengthen your spine, coming to a flat back and curling your sternum forward. Exhale, press down through your palms, round your spine and draw your legs and feet together. Next inhale, glide your feet apart and lengthen your spine. Continue to repeat for 10 breaths, drawing the legs together on your exhale and pressing them apart on your inhale.
See also 4 Ways to Modify Chair Pose
Supported Warrior III with a Strap
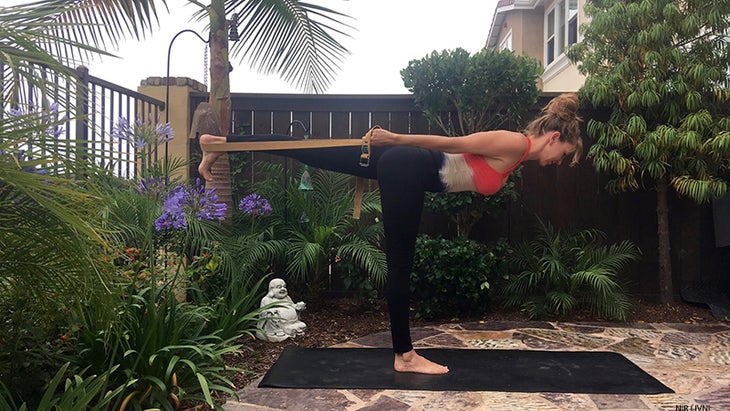
Hate Warrior III Pose? You’re going to love this supported variation. The dynamic action of pushing through the lifted heel while also pulling through the hands, engaging the shoulder blades on upper back, feels incredibly stable and allows you to work on engaging the core and lengthening out the spine.
Holding onto each end of the strap, stand in Tadasana with the strap behind you. Step one heel on the strap. Inhale, lift up through your sternum and, with straight arms, engage your shoulder blades onto your upper back. Continue to press your heel down into the strap and pull your hands, lengthening the sides of your body, as you slowly begin to tilt forward and lift your leg up into Warrior III.
See also Stoke Your Inner Warrior with Sadie Nardini’s Solar Plexus Power Flow
Crow on a Block
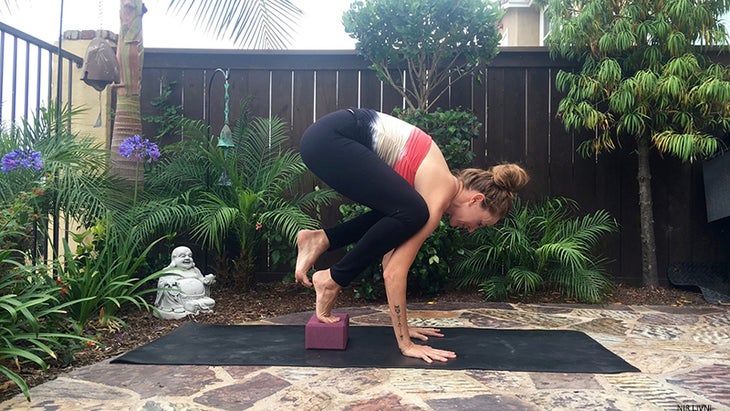
Crow Pose requires a decent amount of strength for execution. But if your hips won’t allow you to get your knees above the height of your elbows, then it’s nearly impossible to take flight in the arm balance. Give your hips a lift by perching your Crow on a block.
Place a block flat in the middle of your mat. Stand with your feet on the block and squat down, placing your hands on the mat in front of you and opening your knees around your arms. Squeeze your inner knees around your upper arms and lift your hips up higher. Keep squeezing your inner thighs together, draw up through your core, and strongly grip the floor as you take your gaze slightly forward. Play with taking one foot off the block at a time, allowing yourself to tilt forward and find your Crow Pose.
Already an expert at Crow? Instead, try holding the block between the inner edges of your feet and bring it toward your sitting bones in the arm balance.
See also Challenge Pose: 4 Steps To Side Crow (Parsva Bakasana)
Wheel on Blocks
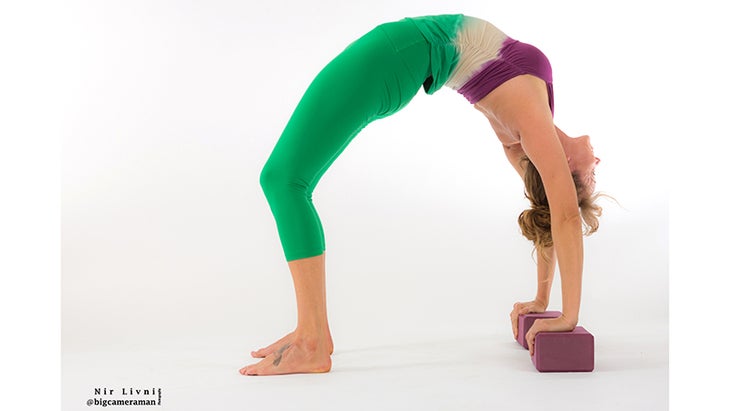
Students with tighter shoulders, who struggle to press up into Urdhva Dhanurasana from the floor can find more space in the full backbend with their hands on blocks at the wall. I also find it’s the best way to teach beginners how to approach and work toward the pose.
Tightly wedge a pair of blocks (shoulder-width apart) into the base of the wall and the floor and lie on your back with your head between the blocks at the wall, knees bent and feet flat. Place your palms on the top side of the block by your ears with the heel of your hand and your fingers wrapped around the front side. Draw your elbows toward one another and firmly press your palms down into the blocks as you lift your body away from the floor and place the top of your head lightly on the mat. Point your elbows at the wall and draw your shoulder blades onto your back. Push down through your feet and the palms of your hands and straighten your arms, lifting the crown of your head off the floor and coming up into Full Wheel Pose.
See also 5 Poses to Try With a Dharma Yoga Wheel
Bow Pose on a Bolster
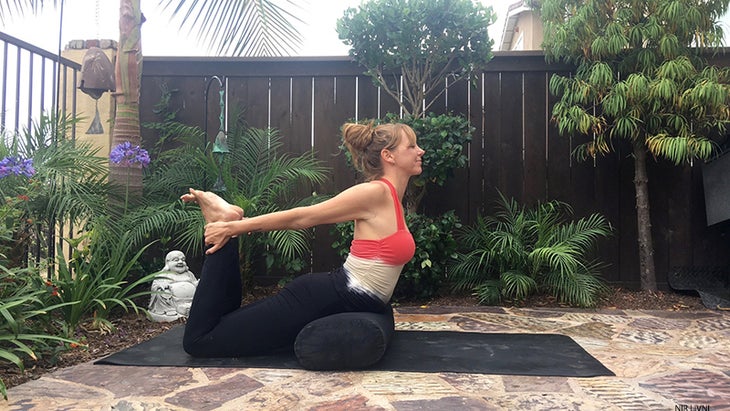
Most students have a love/hate (as in despise) relationship with Bow Pose. You can nearly feel the room collectively groan with the teacher says bend both knees and reach back for both ankles (and the relief when I only have my students do one). It’s a difficult pose, requiring open shoulders and thighs as well as a ton of spinal extension. And it doesn’t always feel so great in the low back.
I fell in love with this variation of supported Dhanurasana. Having the bolster beneath your low abdomen and frontal hip points rocks you back just enough to keep your knees on the floor as your kick back with your heels and lengthen your sternum forward and up. You really get to experience the opening of the chest without the pinch in your low back that’s so common in this pose.
See also Target Tight + Weak Spots: A New Way To Do Bow Pose
Balancing Postures on a Block

Step up your concentration game and put your balance to the test by standing on a block as you transition through even the most basic balancing poses. Rather than collapsing out of balancing postures as we often do once they’re over, standing on a block forces you to remain present and focused as you move in and out of the poses and from left to right side. It’ll also strengthen your arches and ankles, which may be sore the next day.
Place a block flat and lengthwise on your mat (hint: the denser the block the easier it is). Start by standing with both feet on the block and deepen your breath. When you’re ready, wiggle one foot to the middle of the block and draw the opposite knee into your chest. From there you can practice any number of one-legged standing poses, including Tree Pose, Eagle Pose, Extended Hand-To-Big-Toe Pose and Warrior III Pose.
For an extra challenge: Place a second block on the crown of your head!
See also Skillful Sequencing: Plan a Chakra-Balancing Yoga Class
Standing Poses with Back Foot on a Blanket
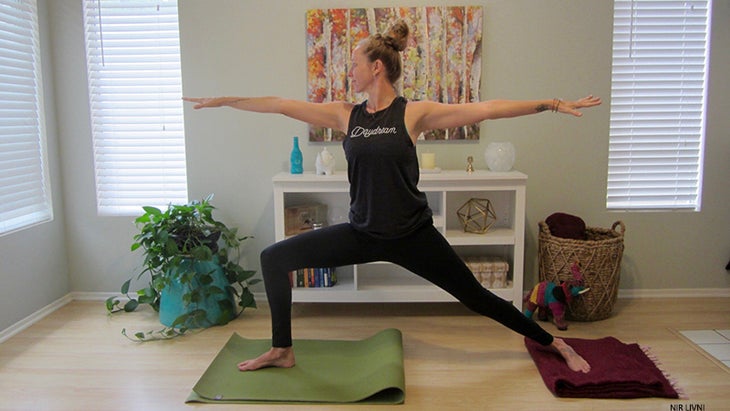
One of the key actions in all standing poses is drawing in to the midline and engaging the legs toward one another. Finding and engaging the inner thigh muscles of your back leg can be tough to do, though. Placing your back foot on a sliding blanket in Warrior II Pose will immediately teach you how to hug the back leg forward.
Fold your mat in half and place a neatly folded blanket flat on the floor at the rounded edge. Come to stand with your right foot on the mat (toes pointed forward) and your left foot on the blanket in preparation for Warrior II. With your hands on your hips, slowly begin to bend your right knee and slide your left foot back away from the mat until you are in a Warrior II stance. Hold for a few rounds of breath.
See also Mindful Anger Management: Deepen Your Understanding of the Emotion
Scorpion Pose Over a Chair

While there aren’t generally folding chairs lying around most studios (check the closets), they can be fantastic props and teaching tools as shown here in Scorpion Pose.
Place the short edge of your mat at the wall and the chair on the mat with its back against the wall. Come down to all fours and place your elbows on mat with your forearms parallel (you can either grab the front legs of the chair or place your palms flat spreading your fingers with the front feet between your index finger and thumb). Lift your knees, coming into Dolphin Pose. When you’re ready, kick both feet up to the wall. The chair then offers you different platforms to lower your feet onto as you practice the deep backbend in different stages (first the top of the chair then the seat). The chair’s great for practicing the difficult inversion and working on its various elements.
See also Scorpion Pose: Replacement for Headstand if You Have a Neck Injury
About Our Writer

Meagan McCrary is a 500 E-RYT and writer with a passion for helping people find more comfort, clarity, compassion, and joy on the mat and in life. She’s the author of Pick Your Yoga Practice: Exploring and Understanding Different Styles of Yoga, an encyclopedia of modern yoga systems, as well as a contributor at yogajournal.com. Living in Los Angeles, Meagan teaches at various Equinox Sports Clubs and at Wanderlust Hollywood. Find her on:
http://www.meaganmccrary.com
Twitter: @MeaganMcCrary
Instagram: @msmeagan
Facebook: @meaganmccraryyoga