- India
- International
Friday, Apr 26, 2024
Journalism of Courage
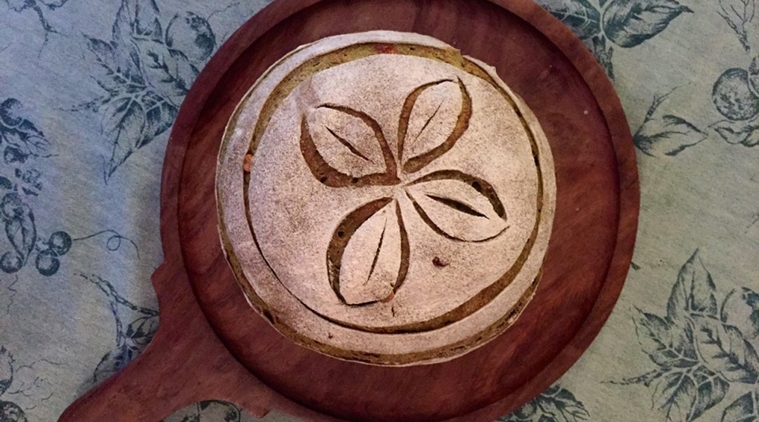 Flavoured with spinach, caramelised onions, garlic, Parmesan cheese and freshly grated nutmeg, Nolen gur and crushed walnuts, this bread is pure sensory overload. (Source: glutenforgluttons.com)
The last time I made this bread was a long, long, time ago – July 2014 and ever since, I’ve always wanted to bake this bread again – with pureed spinach. And when I spotted some fresh spinach, I knew it was time to play with this recipe again. And in keeping with my insatiable appetite for experimenting, I tweaked the earlier recipe. Here it is:
Ingredients
1 tbsp/15ml – Sunflower oil
1 – Onion, medium-sized, chopped
170gms – Fresh spinach leaves (minus the stalks)
1 – Large clove of garlic, minced
2 – Green chillies, sliced fine
120ml – Water
450g – Organic flour (90g wholewheat flour, WWF, and 360g all-purpose flour, APF)
9g – Sea salt
90g – Young levain
1 – Egg
1/2 tsp – Grated nutmeg
50g – Grated Parmesan cheese
1 tsp – Nolen Gur (date jaggery – substitute with liquid jaggery/molasses)
2 tsp – Crushed walnuts
Method
* Heat the oil in a frying pan and add the chopped onion.
* When the onions have softened, add the chopped garlic and the green chillies.
* Sauté till the onions turn golden brown.
* Add the spinach to the sautéed onions mixture and stir well till the spinach leaves have wilted.
* Take off the fire, mix well and keep aside for it to cool.
* Blend this mixture (along with the left over oil – if any), using some of the water, till you get a puree that’s smooth and thick in consistency.
* Beat the egg and mix with the remaining water.
* Mix together the flour, grated nutmeg, walnuts, Parmesan cheese, sea salt, Nolen Gur and levain.
* To this, add the blended spinach and the egg water mixture. Use a wooden spoon to mix them together till all of the flour is wet. Knead till the dough is well mixed.
* If you’re new to kneading – check some of my old blogs for video links on how to knead – else just head to YouTube and search for kneading.
* Cover with loosely wrapped cling-film and let it rise to approximately twice the size. (This will take approximately 2-and-a-half to 3 hours).
* Using a spatula, transfer the dough onto a floured surface. The process of transferring the risen dough onto a floured surface will gently de-gas the dough so you don’t have to punch down the dough. Shape the dough into a boule (round shape). Again, there are lots of videos on YouTube to help you get a handle on the shaping technique.
* Line the baking sheet/tray with parchment paper and transfer the shaped dough, seam side down on the parchment paper. Cover with oiled cling film loosely and let it rise in a warm place for about 2 hours or till the dough passes the finger-dent test. About an hour before you’re ready to bake, pre-heat the oven to 220? along with a baking tray it the bottom rack.
* Just before you ease the dough into the oven, dust the surface of the dough lightly with flour (I sometimes use a 50-50 mixture of APF and WWF and sometimes a 50-50 mixture of Rice flour and APF).
* Using a sharp knife/blade, score (slash) the top of the boule with any design that appeals to you. Slash quickly and let the blade do the cutting – you don’t have to put pressure on the blade. Transfer to the middle rack and immediately pour some boiling hot water onto the tray that was pre-heated with the oven. Shut the oven door and let the bread bake with the steam generated for 20 minutes.
* After 20 minutes, remove the tray that had water, turn down the temperature to 200 degrees C and bake for 10–15 minutes or until golden and the bottom sounds hollow. Transfer onto a wire rack to cool and enjoy with some mildly flavoured soup.
* Am glad I tried this recipe again. Not only did it turn out way better than my previous experiment – it looks better too. What do you think? Happy Baking!
Note: Recipe inspired by Jennie Shapter. Modifications made.
For news updates, follow us on Facebook, Twitter, Google+ & Instagram

What phase 1 voter turnout says about BJP’s chances inSubscriber Only
UPSC Essentials | Daily quiz: environment, geography, & moreSign In to read

Road ahead for Tesla: Why EV sector is strugglingSubscriber Only

Engineering in local language sees uptick in students in UP,Subscriber Only

How Bengaluru’s lakes disappearedSubscriber Only

India’s trade with Israel & Iran, and impact of regionalSubscriber Only

Acting is about convincing others, and the best actors can become anyone. Legendary actors like Mammootty, Kamal Haasan, Shah Rukh Khan have played versions of themselves, and now Nivin Pauly is attempting something similar in Varshangalkku Shesham. This takes courage and skill, but it can create a powerful and memorable performance.