This post will guide you through getting up and running with RTDSphinx-PHP, a ReadTheDocs-friendly Sphinx based PHP documentation skeleton with sane defaults, pre-installed directives, and modified styles for optimal API and prose documentation rendering in multiple languages. For an unfinished example of the documentation, see here and switch the language in the bottom left flyout panel.
If this sounds familiar, it’s because we already went through a manual setup of a similar skeleton in a previous post, but that one had no localization support, too many steps, and wasn’t as reusable as this newly developed one. This guide will not be a “let’s build it from scratch” project, but rather an overview of the features this skeleton project offers out of the box, and an introduction into its usage.
This post will be the first in a long line of many SitePoint branded projects meant for wide-spread public consumption, fully open source and highly welcoming of other people’s contributions.

Quickstart
For prerequisites, make sure you have Python and pip, the Python package manager, installed.
First, clone the skeleton into a folder – either a subfolder of your project, like projectRoot/docs or into its own folder – anything goes.
git clone https://github.com/sitepoint/rtdsphinx-php docsOptionally, create a Python virtual environment.
Then, while inside the cloned folder, install prerequisites from the requirements.txt file by running:
pip install -r requirements.txtThis will install all necessary packages.
That’s it. To generate files for a new language, run:
bin/update.sh xx… where xx is the language code (e.g. “jp” for Japanese).
Then, edit files in locale/xx/LC_MESSAGES that end in .po.
To compile the HTML from these translations, run:
bin/build.sh xx yy zz… where xx, yy and zz are language codes for all the languages you want to build. Inspect your generated HTML by opening _build/html/xx/index.html in a browser.
For deploying to ReadTheDocs, see below.
Features
The following sections will list the features SitePoint’s RTDSphinx-php project has beyond the default Sphinx installation with the RTD theme.
Localization
Getting localization to work in Sphinx is almost trivially easy. However, it’s not as simple on ReadTheDocs. That’s why this skeleton comes bundled with a ready-to-go localization setup that’s both prepped for local work with custom deployment, and deployment on ReadTheDocs.
In the skeleton, you’ll find a locale folder. This folder contains automatically generated language files for languages of your choice. By default, it contains en and hr. If you look inside the LC_MESSAGES folder of each, you’ll notice several *.po files (and some .mo files). The .mo files are machine readable files generated from *.po files, so you don’t need to touch them. .po files are, in turn, created from template files (*.pot), located in _build/locale.
To update / create translations, you only update .po files. For example, if you look at the file locale/hr/LC_MESSAGES/01-example.po at lines 18-20:
#: ../../01-example.rst:17
msgid "The awesome class does awesome things. Instantiate like so::"
msgstr ""
The first line is a gettext comment, telling gettext where the string with the ID which immediately follows comes from. In our case, it comes from /01-example.rst at line 17. The msgid value is the ID of the string to be translated. The msgstr value is what the ID in the text should be replaced with. If we leave msgstr empty, the ID gets printed instead – this ensures that incomplete translations don’t end up showing blank content, but rather their original, (in this case) English version of the missing strings.
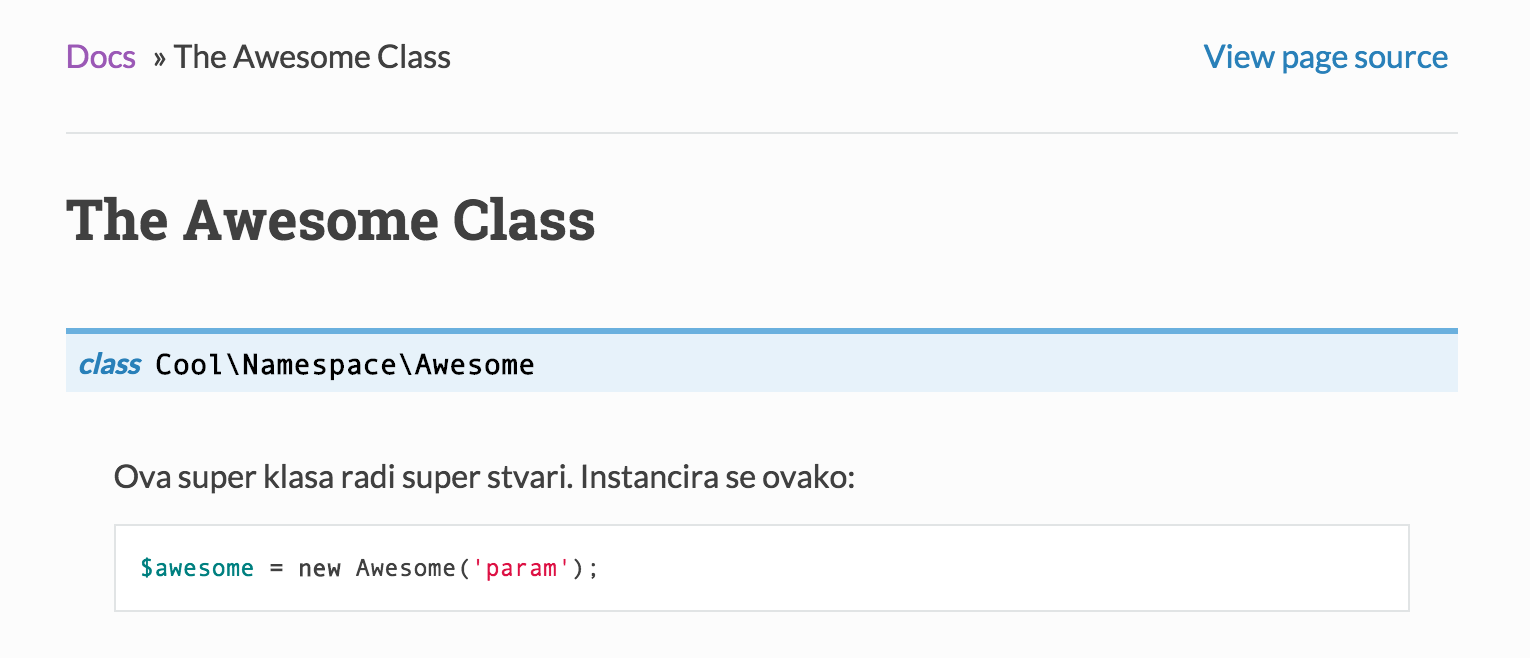
If we update this file with a translation:
#: ../../01-example.rst:17
msgid "The awesome class does awesome things. Instantiate like so::"
msgstr "Ova super klasa radi super stvari. Instancira se ovako::"
and then run:
bin/build.sh hrThe newly generated HTML should reflect this change:
You may be wondering how you can define which strings to extract for translation. The answer is – you don’t. Gettext and Sphinx do this for you. They recognize paragraph breaks and sections and automatically pull out anything they think is translatable. This is good – it means you can focus on just writing the original-language docs, and rely on the software to extract it into language files for you, which you can then give directly to your translators.
Utility Scripts
The skeleton comes with several useful utility scripts, all found in the bin subfolder.
The configure.sh script is used to replace some placeholder values in your project with desired ones in one go: the project name, the author name, and the project slug. The slug is the url-friendly name of the project, and will default to a slugified version of the project name if omitted. For example, “My Project” will be slugified into “my-project”. The configuration script is invoked like so:
bin/configure.sh "My superb documentation" "John Doe" my-docsThe update.sh script is used to update *.pot files when changes to the source *.rst files are made. It is also used to generate new *.po files from those *.pot files, whether for the existing languages or newly added ones. It does all of this automatically, and only needs language codes in order to know what to update:
bin/update.sh jpThe build.sh script compiles the *.po files into machine code *.mo files, and builds the HTML. The resulting HTML can be inspected by opening _build/html/xx/index.html in a browser, where xx is the language code of your choice. For English, Croatian and Japanese at the same time, it is invoked like so:
bin/build.sh hr en jpPHPDomain and Default Syntax Highlights
This skeleton project is tweaked for PHP. As such, it defaults to PHP syntax highlighting and comes with PHPDomain pre-installed.
The syntax highlighting defaults make sure no code snippets need to be prefixed with <?php, and no explicit language need be defined in PHP code snippets. See bottom of overview.rst for an example:
Some other instructions go here::

    $awesome = new Awesome('param');
    $awesome->doGreatThings();
Apart from syntax highlights built-in and activated by default, this skeleton also uses PHPDomain – a set of directives designed for rendering source code documentation in the spirit of PHPDocumentor or ApiGen and similar tools, only less automatic but much more readable.
It is recommended you use one *.rst file per class in your project, unless you’re dealing with very small classes under the same namespace or interfaces. Using the directives is straightforward:
define the namespace of the class being described:
.. php:namespace:: Cool\NamespaceThe namespace will prefix all classes below it, until a new namespace is declared.
define a class:
.. php:class:: AwesomePut a class description above or below this declaration, Sphinx doesn’t care. A good practice is putting the general description above, and putting the constructor description and params below the class declaration. Don’t forget the indent the description that comes below the declaration – this is Python, after all.
define a method – static with
.. php:staticmethod:: someStaticMethod()or dynamic with.. php:method:: someMethod(). Add params and returns values like so (careful of the indent!):.. php:staticmethod:: someStaticMethod($someParam) This method is static. See the ``.rst`` source file for how this is defined. :param string $someParam: A parameter needed by the method :returns: void, or throws an \\InvalidArgumentException if the param is invalid Usage:: Awesome::someStaticMethod($someParam);
By default, methods and classes will get permalinks auto-generated next to them.

However, these links will not appear in the TOC to the left. If you wish to link to arbitrary locations in the documents (these can be locations just above the methods or classes, so you simulate linking to them), use the project’s hidden role. This custom-defined role attaches a class to section elements generated with the role which makes the section invisible in the content (thus not breaking flow) but appearing in the TOC (thus linking to an arbitrary, invisible part of the documentation). The hidden role is used like this:
:hidden:`someStaticMethod`
""""""""""""""""""""""""""
The separator can be anything – it doesn’t have to be quotes (") – but it does need to match the length of the wording above it, and it does need to be unindented fully – so all the way to the left. For an example of use, see the raw version of 01-example.rst.
This combination of plugins and customizations allows for a beautifully rendered source code documentation, deep linked in the table of contents, and explained in depth with tutorial-like prose, for your readers’ convenience.
Custom CSS
The skeleton comes with CSS overrides of default styles. If you have custom styles you wish to include, add them to the end of the _static/css/my_theme.css file.
The CSS files are configured in such a way that changes to them are visible in both local versions, and when deployed to RTD.
In the skeleton’s case, custom styles were added to make PHPDomain’s integration with the ReadTheDocs theme prettier, and to make the PHPDomain’s API method links appear in the table of contents.
Publishing on ReadTheDocs
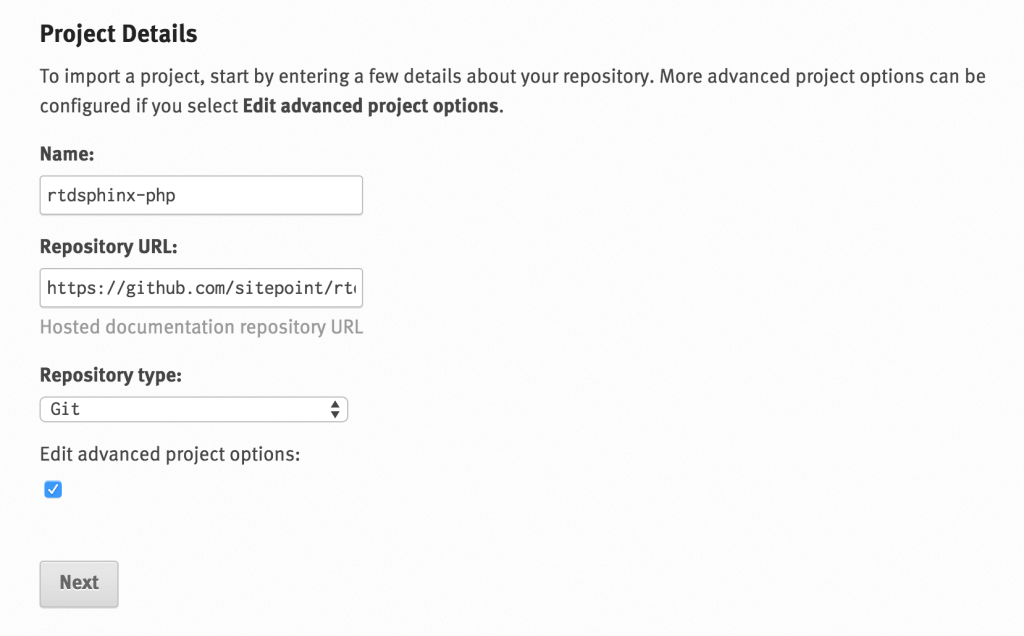
In the previous post, we hosted on RTD by importing our Github repos and selecting from the list. For a multi-language project based on a single source repo, that won’t work – RTD only allows importing a repo from the Github list once. Instead, we need to select the manual option when adding a project:
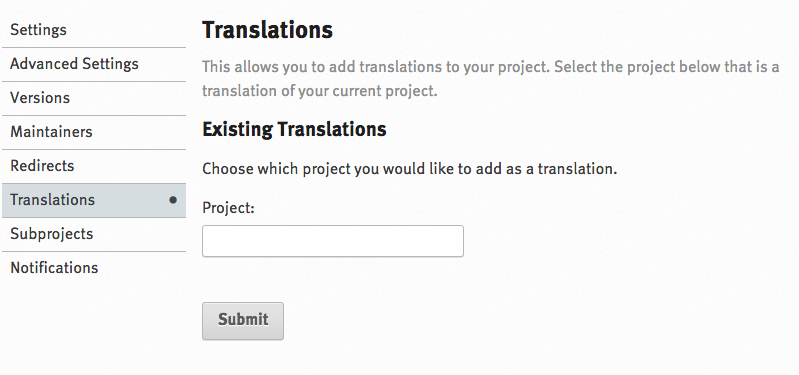
Sphinx supports localization out of the box, but RTD doesn’t work that way. On RTD, every translation of a project needs to be a separate project in its own right, and then defined as a translation of another project in the latter’s settings:
Every RTD project gets a language selector in the options. RTD, when building the docs, passes this as a parameter to the Sphinx builder. If a Sphinx project has the locales folders defined and a language argument present, the project will be built with that language, provided the language files exist.
The procedure is:
- Set up the main English project
- Set up a new manual project of a different name for another language. E.g. if
enwasrtdsphinx, thehrone could bertdsphinx-hr - Go into Advanced Settings of each, and input
requirements.txtas the requirements file, andconf.pyas the configuration file. - Make sure both build successfully and can be viewed live.
- Go to the main English project, to the Translations menu, and enter the name of the other project (
rtdsphinx-hr). Once added, save the project by going to another options screen and clicking Submit (this is necessary because translation linking doesn’t happen until you hit save).
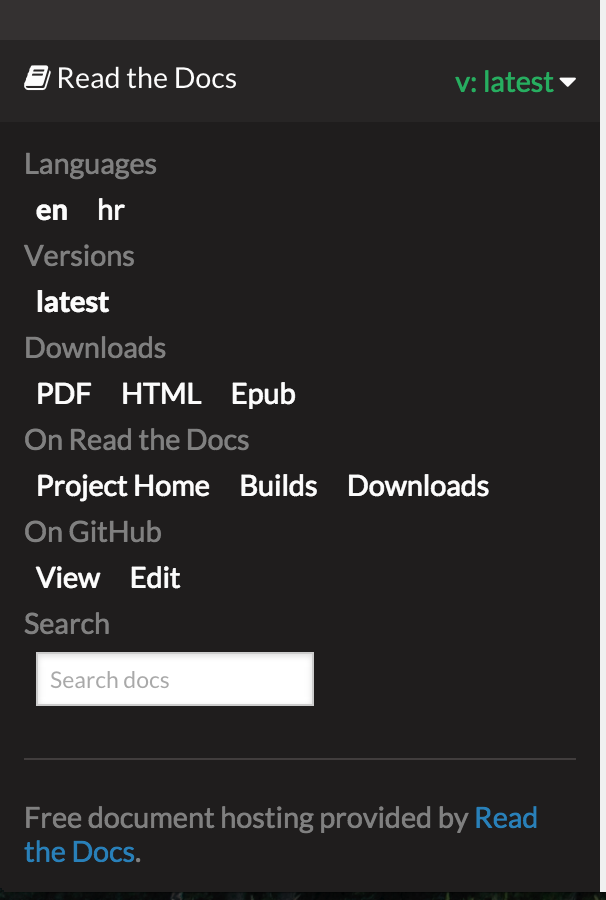
The language should now be switchable in the bottom menu on the main project:
Conclusion
SitePoint’s RTDSphinx-PHP project is one of many SitePoint-branded open source efforts that will be popping up in the near and far future. If you’re confused about any aspect of this project, please let us know, will you? And if you’d like to contribute or tell us about an issue, the repo is here.
By having project docs available in several languages, you make your work automatically available to a much wider audience, bringing together thus far unlinked communities. There’s no reason NOT to do it.
Do you localize your project docs? If so, how? If not, why not?
Frequently Asked Questions (FAQs) about Multi-Language Docs with SitePoint’s RTDSphinx PHP
How can I manage translations in Sphinx?
Managing translations in Sphinx involves a few steps. First, you need to set up your project for internationalization by adding the necessary configuration in your conf.py file. This includes specifying the languages you want to support and the location of your translation files. Once this is done, you can use the sphinx-intl command-line tool to generate and update your translation files. You can then use a translation tool to translate your content. Finally, you can build your translated documents using the sphinx-build command.
What is the best practice for a multiversion documentation in different languages in Sphinx?
The best practice for creating multiversion documentation in different languages in Sphinx involves using the sphinx-multiversion extension. This extension allows you to build documentation for multiple versions of your project from different branches or tags in your repository. You can configure the extension to build documentation for specific versions and languages. This way, you can maintain separate versions of your documentation for each release of your project and for each language you support.
How can I internationalize Sphinx?
Internationalizing Sphinx involves setting up your project for internationalization and then translating your content. To set up your project, you need to add the necessary configuration in your conf.py file. This includes specifying the languages you want to support and the location of your translation files. You can then use the sphinx-intl command-line tool to generate and update your translation files. Once this is done, you can use a translation tool to translate your content. Finally, you can build your translated documents using the sphinx-build command.
How can I solve issues related to Sphinx documentation?
Solving issues related to Sphinx documentation often involves troubleshooting the problem, identifying the cause, and then implementing a solution. The specific steps you need to take will depend on the nature of the issue. However, some common solutions include checking your configuration, updating your Sphinx installation, and ensuring your content is correctly formatted. If you’re unable to resolve the issue yourself, you can seek help from the Sphinx community by posting a question on the Sphinx GitHub page or on a relevant forum.
How can I use SitePoint’s RTDSphinx PHP for fast multi-language docs?
Using SitePoint’s RTDSphinx PHP for fast multi-language docs involves setting up your project, generating your documentation, and then translating your content. First, you need to install RTDSphinx PHP and configure it for your project. You can then use it to generate your documentation in a format that’s easy to translate. Once your documentation is generated, you can use a translation tool to translate your content into different languages. Finally, you can use RTDSphinx PHP to build your translated documents.
How can I add support for additional languages in Sphinx?
Adding support for additional languages in Sphinx involves modifying your conf.py file to specify the additional languages you want to support. You can do this by adding the language codes for the additional languages to the ‘locale_dirs’ configuration option. Once this is done, you can use the sphinx-intl command-line tool to generate and update your translation files for the additional languages. You can then translate your content and build your translated documents.
How can I update my translation files in Sphinx?
Updating your translation files in Sphinx involves using the sphinx-intl command-line tool. You can use this tool to generate new translation files for your content and to update existing translation files when your content changes. To do this, you need to run the ‘sphinx-intl update’ command, specifying the languages for which you want to update the translation files.
How can I build my translated documents in Sphinx?
Building your translated documents in Sphinx involves using the sphinx-build command. You need to run this command, specifying the source directory, the build directory, and the language for which you want to build the documents. The command will then build your documents in the specified language, using your translation files to replace the original text with the translated text.
How can I translate my content in Sphinx?
Translating your content in Sphinx involves using a translation tool. Once you’ve generated your translation files using the sphinx-intl command-line tool, you can open these files in your translation tool and translate the content. The translation files are in the gettext format, which is supported by many translation tools. Once your content is translated, you can build your translated documents using the sphinx-build command.
How can I configure Sphinx for internationalization?
Configuring Sphinx for internationalization involves modifying your conf.py file. You need to add the necessary configuration options to this file to specify the languages you want to support and the location of your translation files. This includes the ‘locale_dirs’ option, which specifies the directory where your translation files are located, and the ‘language’ option, which specifies the default language for your project.
 Bruno Skvorc
Bruno is a blockchain developer and technical educator at the Web3 Foundation, the foundation that's building the next generation of the free people's internet. He runs two newsletters you should subscribe to if you're interested in Web3.0: Dot Leap covers ecosystem and tech development of Web3, and NFT Review covers the evolution of the non-fungible token (digital collectibles) ecosystem inside this emerging new web. His current passion project is RMRK.app, the most advanced NFT system in the world, which allows NFTs to own other NFTs, NFTs to react to emotion, NFTs to be governed democratically, and NFTs to be multiple things at once.