How to make double exposures with a dSLR
Learn how to use a feature on your dSLR to make creative double exposures, from silhouettes to clone portraits.


- Webby Award honoree, 2x Gold Telly Award winner
A double exposure is a creative photographic technique where two different images are combined in one frame.
Also known as multiple exposures (depending on the final number of images superimposed on one another) you can make these photos in-camera -- no Photoshop skills required. Here's a guide on how to get started with this technique using a dSLR with a multiple exposure mode. We've gone through the steps with the Canon 5D Mark III and Nikon D800.
Not sure if your camera has a multiple exposure mode? Check the manual or do a quick internet search to find out.


Making silhouettes
You may have seen photos where a silhouette appears to have a pattern inside it. This is just one example of a double or multiple exposure.
You will need:
- a DSLR with multiple exposure mode
- a silhouette as your base image
- a fill for the silhouette

For this example I'll show you how to do this using the Canon.
First, find a subject. This could be a person or any another sort of object. The most important part is to have a defined outline.
As with any silhouette, try and position the subject in a shot so there's lots of negative space in the background to really make it pop. This can be the sky, or even a white wall -- overcast days are your friend for this!
I like to use the dSLR's spot meter to help meter off the subject and blow out the background. Silhouettes for this project turn out best if there's a strong light source coming from behind your subject.
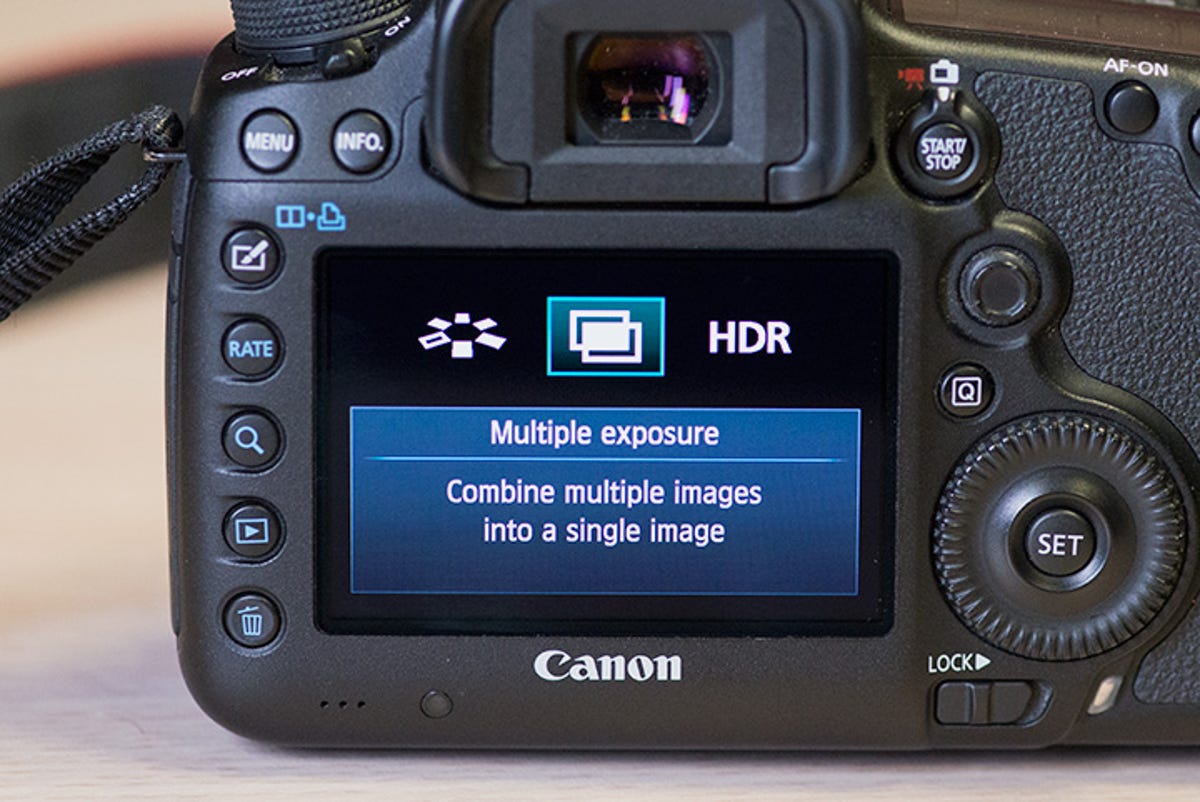
Once you are satisfied with the silhouette you have taken, enter into multiple exposure mode. At the back of the 5D Mark III, press the paintbrush icon and scroll over to the multiple exposure option.
Switch "Disable" to "On: Func/Ctrl". Leave the other settings as they are by default: Additive with two exposures. You can also choose to save all the images individually if you need to repeat the process with a different exposure later on.

Scroll down to "Select image for multi. expo." and choose the silhouette you previously shot using the Set button. Confirming this selection will bounce you back to the multiple exposure menu.
The easiest way to compose your finished photo is to use live view. Switch it on and you should see the silhouette shot overlaid on the display.

Now comes the fun part. Hunt around for a pattern, some trees or flowers, or anything else you want to place in the silhouette. The only limit is your imagination.
Usually, you'll need to slightly underexpose this second image from what the meter tells you (or use exposure compensation if you are in Program mode). This is because we've chosen "Additive" as our blend mode which combines the exposure of both images.
Take the second image, give the camera some time to process and voila -- your silhouette multiple exposure is done.
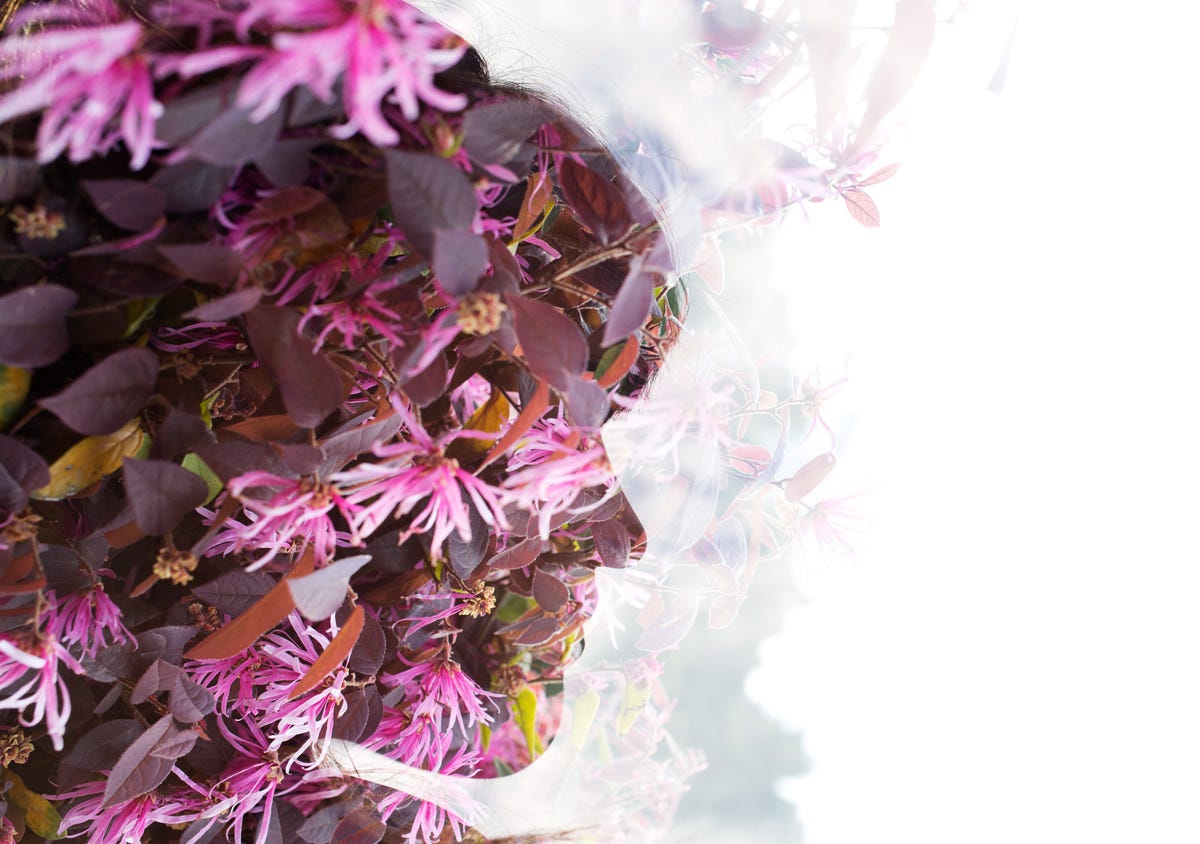
As with all photographic techniques, it requires some time to master and get the results you desire. You may want to experiment with positioning the fill within the silhouette. If you have blown out the background of the first image, the fill image should theoretically only appear within the silhouette.
Hat tip to two photographers who have pioneered the technique - Dan Mountford and Sara Byrne for their inspiring silhouette photos. Definitely check them out for more amazing images.
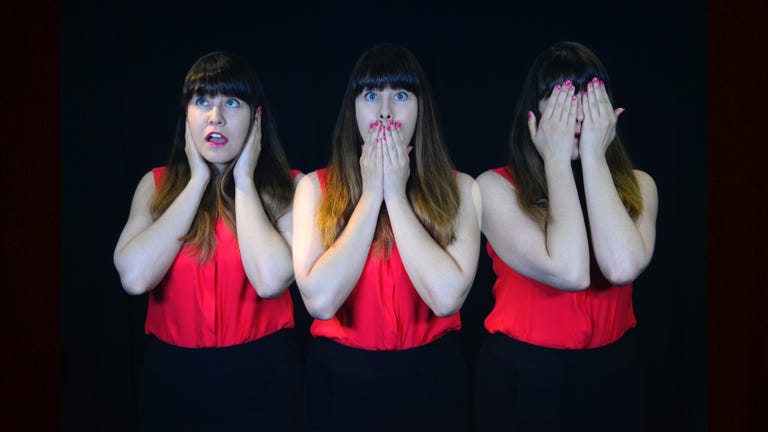
Multiplicity: clone yourself
Another way to experiment with in-camera multiple exposure is to clone your subject (or yourself).
You will need:
- a DSLR with multiple exposure mode
- tripod
- subject to photograph. Alternatively, use yourself as a subject but you will need a remote control
First, grab a tripod and frame up your shot. Focus and expose the shot to your liking. For consistency's sake it is easier to fix the exposure using manual mode.

Using the Nikon, turn on multiple exposure. Press the menu button and then find multiple exposure under the shooting menu. Turn it on, and select single photo. Choose the number of shots you want in the final frame. If you want three clones, choose three photos.
Turn on auto gain so your exposures are evened out in the final shot rather than added together.
Get your subject in the first position and take the photo. You can put yourself in the frame, but you will either need to grab a friend to take the shots, or use a remote to trigger the camera. Rinse and repeat for the next frames, and then the camera will automatically merge them into a finished shot.

Depending on your exposure and the background, you may find that the subject appears ghost-like. Without using an editing program like Photoshop, it can be difficult to get a result where the subjects look solid, but there are a few things you can do to help improve the results in-camera.
If you are using a Nikon dSLR, turn off Active D-lighting. Choose a darker background rather than shoot outdoors. Black produces the best results. You can also increase the amount of light on your subjects by using a flash. Otherwise adjust your exposure to gather more light by opening up the aperture or boosting the ISO.
Remember, you can apply these techniques to any dSLR that has a multiple exposure mode. The method may be a little different from model to model, but the general principle is the same. Go out, experiment and have fun with your photography.